13 of the very best Android 12 suggestions and methods that it’s best to know – Phandroid
Android 12 is lastly right here, and this launch marks probably the most drastic Android releases that we’ve seen since Materials Design was launched and applied all the way in which again in 2014. From privateness controls to theming engines and options which were requested for years, there’s rather a lot to dive into when utilizing Android 12. Since we’ve been spending time with it for the reason that first Developer Preview was out there, it’s time to try a few of the greatest Android 12 suggestions and methods to take advantage of out of your Pixel system.
Theme every little thing and something with Materials You
It’s no secret that moreover the privateness adjustments, the most important change to Android 12 is the introduction of the all-new Materials You theming engine. This brings dynamic theming to your whole interface, eradicating the necessity to bounce by a bunch of hoops simply to get completely different colours for the Fast Settings toggles and extra. The theming relies in your wallpaper, as your system acknowledges and pulls the first and secondary colours out of your system, in an effort to carry a uniform expertise throughout your whole system.
- Open the Settings app.
- Faucet Wallpaper & Fashion.
- Faucet Change wallpaper.
- Choose a wallpaper.
- Faucet Set wallpaper.
- Return to the Wallpaper & Fashion Settings menu.
Now that you’ve a brand new wallpaper, you can begin taking part in round with the completely different theming choices supplied by Materials You. Beneath the wallpaper picker in Wallpaper & Fashion, there are two choices to select from with both Wallpaper colours or Fundamental colours. Materials You is at its greatest (more often than not) when choosing the Wallpaper colours. Nonetheless, you’ll be able to choose and select extra fundamental colours which are nonetheless primarily based in your wallpaper if that tickles your fancy.
![]()
Additionally from the Wallpaper & Fashion menu, now we have the next choices:
- Darkish theme (toggle)
- Themed icons (toggle)
- App grid
Though the remainder of the model will be utilized to the whole interface, this could’t be mentioned for Themed icons. As a substitute, this may solely work when utilizing the inventory Pixel Launcher in your Android 12 system. When enabled, themed icons will seem on the Dwelling Display screen for any apps which are appropriate. Presently, this solely applies for many of Google’s personal functions, however we’re hoping to see this increase to third-party apps in future Android 12 releases.
Use one-handed mode
![]()
Though this isn’t essentially true for the Pixel 5, because it’s fairly simple for use with one hand, the identical can’t be mentioned for the multitude of Android units on the market. We’re seeing screens getting larger and extra irritating to make use of if it’s essential attain the highest of the telephone. Some telephones, just like the Galaxy Z Flip 3, can use the fingerprint scanner to drag down the notification shade. However this nonetheless doesn’t remedy the issue of having the ability to faucet one of many Fast Settings toggles with ease.
One-handed mode is nothing new within the Android world, as we’ve seen different telephone makers implement it into their Android skins. However Google is lastly on the identical web page, as Android 12 bakes one-handed mode into the working system. Earlier than you can begin utilizing it, you’ll first must activate it.
- Open the Settings app in your Android 12 system.
- Scroll down and faucet System.
- Scroll down once more and choose One-handed mode.
- Faucet the toggle subsequent to one-handed mode to allow the characteristic.
Additionally from this Settings panel is a toggle for exiting one-handed mode everytime you swap between apps. Moreover, you’ll be able to faucet Timeout and choose how lengthy your telephone ought to preserve one-handed mode activated earlier than going again to full-screen.
When you’ve enabled and customised One-handed mode, activating the mode is as simple as swiping down from the underside middle of the display. Then, you’ll be able to lastly attain the highest of the app, and you’ve got two strategies to return to full-screen mode:
- Swipe up from the underside middle of the display.
- Faucet wherever within the grey space above the app.
Add Good Dwelling Controls to the Lock Display screen
![]()
Probably the most irritating elements of Android over the previous few years is Google’s indecision on the subject of offering fast entry to your sensible house controls. Final yr’s implementation was fairly stellar, because the controls had been added to the Energy Menu. With Android 12, Google is altering issues once more, however after a rocky begin within the beta program, now you can entry your Good Dwelling controls from the Lock Display screen.
- Wake, however don’t unlock, your telephone.
- Faucet the Dwelling button within the backside left nook.
- Faucet the three dots within the high proper nook.
- Choose one of many following:
- Add controls
- Edit controls
- Enter your PIN, or scan your fingerprint.
- Choose the sensible house lights and equipment you need to add.
- If it’s essential add extra, or can’t discover a particular management, faucet the See different apps button on the backside.
- Faucet the Save button.
As you’d count on, deciding on the Edit Controls choice will present the power to take away units and equipment from the checklist. However you may also drag and drop varied sensible house equipment, making some simpler to succeed in or simply increased within the pecking order whenever you entry the Good Dwelling controls from the Lock Display screen.
Return and take a look at your Notification Historical past
![]()
Missed notifications occur. Or, for those who don’t choose your telephone up for some time, the checklist of notifications can appear a bit daunting, so that you simply clear all of them. The issue with that is that you simply would possibly really miss an essential notification, however don’t know which app it got here from. If that’s the case, Android 12 now helps you to return and think about your Notification Historical past.
- Open the Settings app.
- Choose Notifications from the checklist.
- Faucet Notification historical past beneath Handle.
- To allow Notification historical past, faucet the toggle subsequent to the immediate.
As soon as enabled, any notifications that your Android 12 system receives, will seem on this part of the Settings app. Nonetheless, there’s additionally a better method to view any notifications that you simply may need missed.
- Swipe down to disclose the Notification Shade.
- Below the notifications, faucet the Historical past button.
When tapping the Historical past button, it can take proper to the Notification Historical past part inside the Settings app.
Use the Energy Button to activate Google Assistant
![]()
Identical to controlling your sensible house, Google continues to tinker with completely different strategies for activating Google Assistant. In fact, we are able to all the time depend on the “Hey, Google” command, however generally you don’t need to use your voice and would reasonably go for textual content enter with Assistant. On Android 12, one other new “gesture” has been added to the combination, permitting you to activate Assistant with the ability button.
- Open the Settings app.
- Faucet Apps.
- Scroll down and faucet Assistant.
- Faucet Maintain Energy in your Assistant.
- Faucet the toggle to the On place.
By enabling this “gesture”, you’ll now not have entry to the Energy and Emergency menu whenever you press and maintain for Assistant. As a substitute, you have to to press the Energy and Quantity Up buttons on the similar time.
Higher auto-rotation
![]()
No one likes laying on the sofa or in mattress their telephones, solely to have their screens proceed to robotically rotate forwards and backwards. It’s extraordinarily irritating, and we don’t all the time need to “lock” rotation, as we generally tend of forgetting that the rotation was locked afterward. Android 12 is implementing a unique and distinctive characteristic that makes use of your front-facing digital camera and machine studying to find out the orientation of your face.
When Face Detection is enabled, your telephone will solely rotate primarily based on the orientation of your face.
- Open the Settings app.
- Scroll down and faucet Show.
- Scroll down and faucet Auto-rotate display.
- Faucet the toggle subsequent to Allow Face Detection.
Take Scrolling Screenshots
![]()
This has been probably the most requested options for inventory Android customers, and it’s lastly right here. Scrolling screenshots can be found on Android 12, eradicating the necessity to take a number of screenshots and sew them collectively earlier than sharing.
- Take a screenshot in your Android 12 system by urgent the Energy and Quantity Down buttons on the similar time.
- Within the backside left nook, faucet the Seize Extra button.
- Drag the deal with on the backside of the screenshot till you’ve got captured every little thing you need.
- Faucet the Save button within the high left nook.
Search every little thing in your Pixel
![]()
Among the finest Android 12 suggestions is the power to seek for virtually something in your system. As a substitute of simply having the ability to seek for particular apps or make a Google question, Android 12 introduces the power to go looking issues like Shortcuts, Individuals, Settings, and even Pixel Ideas. When trying to find one thing so simple as “Dwelling”, you might be supplied with a large number of various choices to select from. This contains any apps are put in with “house” within the title, together with accessing the rest in your system that has to do with “house”.
That is enabled by default, nevertheless, you’ll be able to bounce into the Settings app and toggle what seems within the on-device search outcomes.
- Swipe up on the Dwelling Display screen to disclose your App Drawer.
- Subsequent to the search bar on the high, faucet the three vertical dots.
- Faucet Preferences within the drop-down menu.
From right here, you’ll be able to merely toggle what’s proven whenever you carry out an on-device search.
Preserve tabs in your Privateness Dashboard
![]()
Google spent fairly a little bit of time on the privateness and safety of your system on the Android 12 announcement throughout I/O 2021. The most important change is the introduction of a brand new Privateness Dashboard, that shows any not too long ago used permissions accessed by varied apps. With the Dashboard, you’ll be able to revoke permissions entry, together with sweeing a breakdown of what permissions have been accessed within the final 24 hours.
- Open the Settings app.
- Scroll down and faucet Privateness.
- Faucet Privateness Dashboard.
By default, the Dashboard exhibits the Location, Digicam, and Microphone permissions. However you’ll be able to faucet the See different permissions part to get the complete checklist of permissions which are accessible in your system. Once more, these solely present which apps have accessed sure permissions inside the final 24 hours, however this must be greater than sufficient as a way to decide if a rogue app is doing one thing that it shouldn’t be doing.
Toggle Digicam and Microphone entry for functions
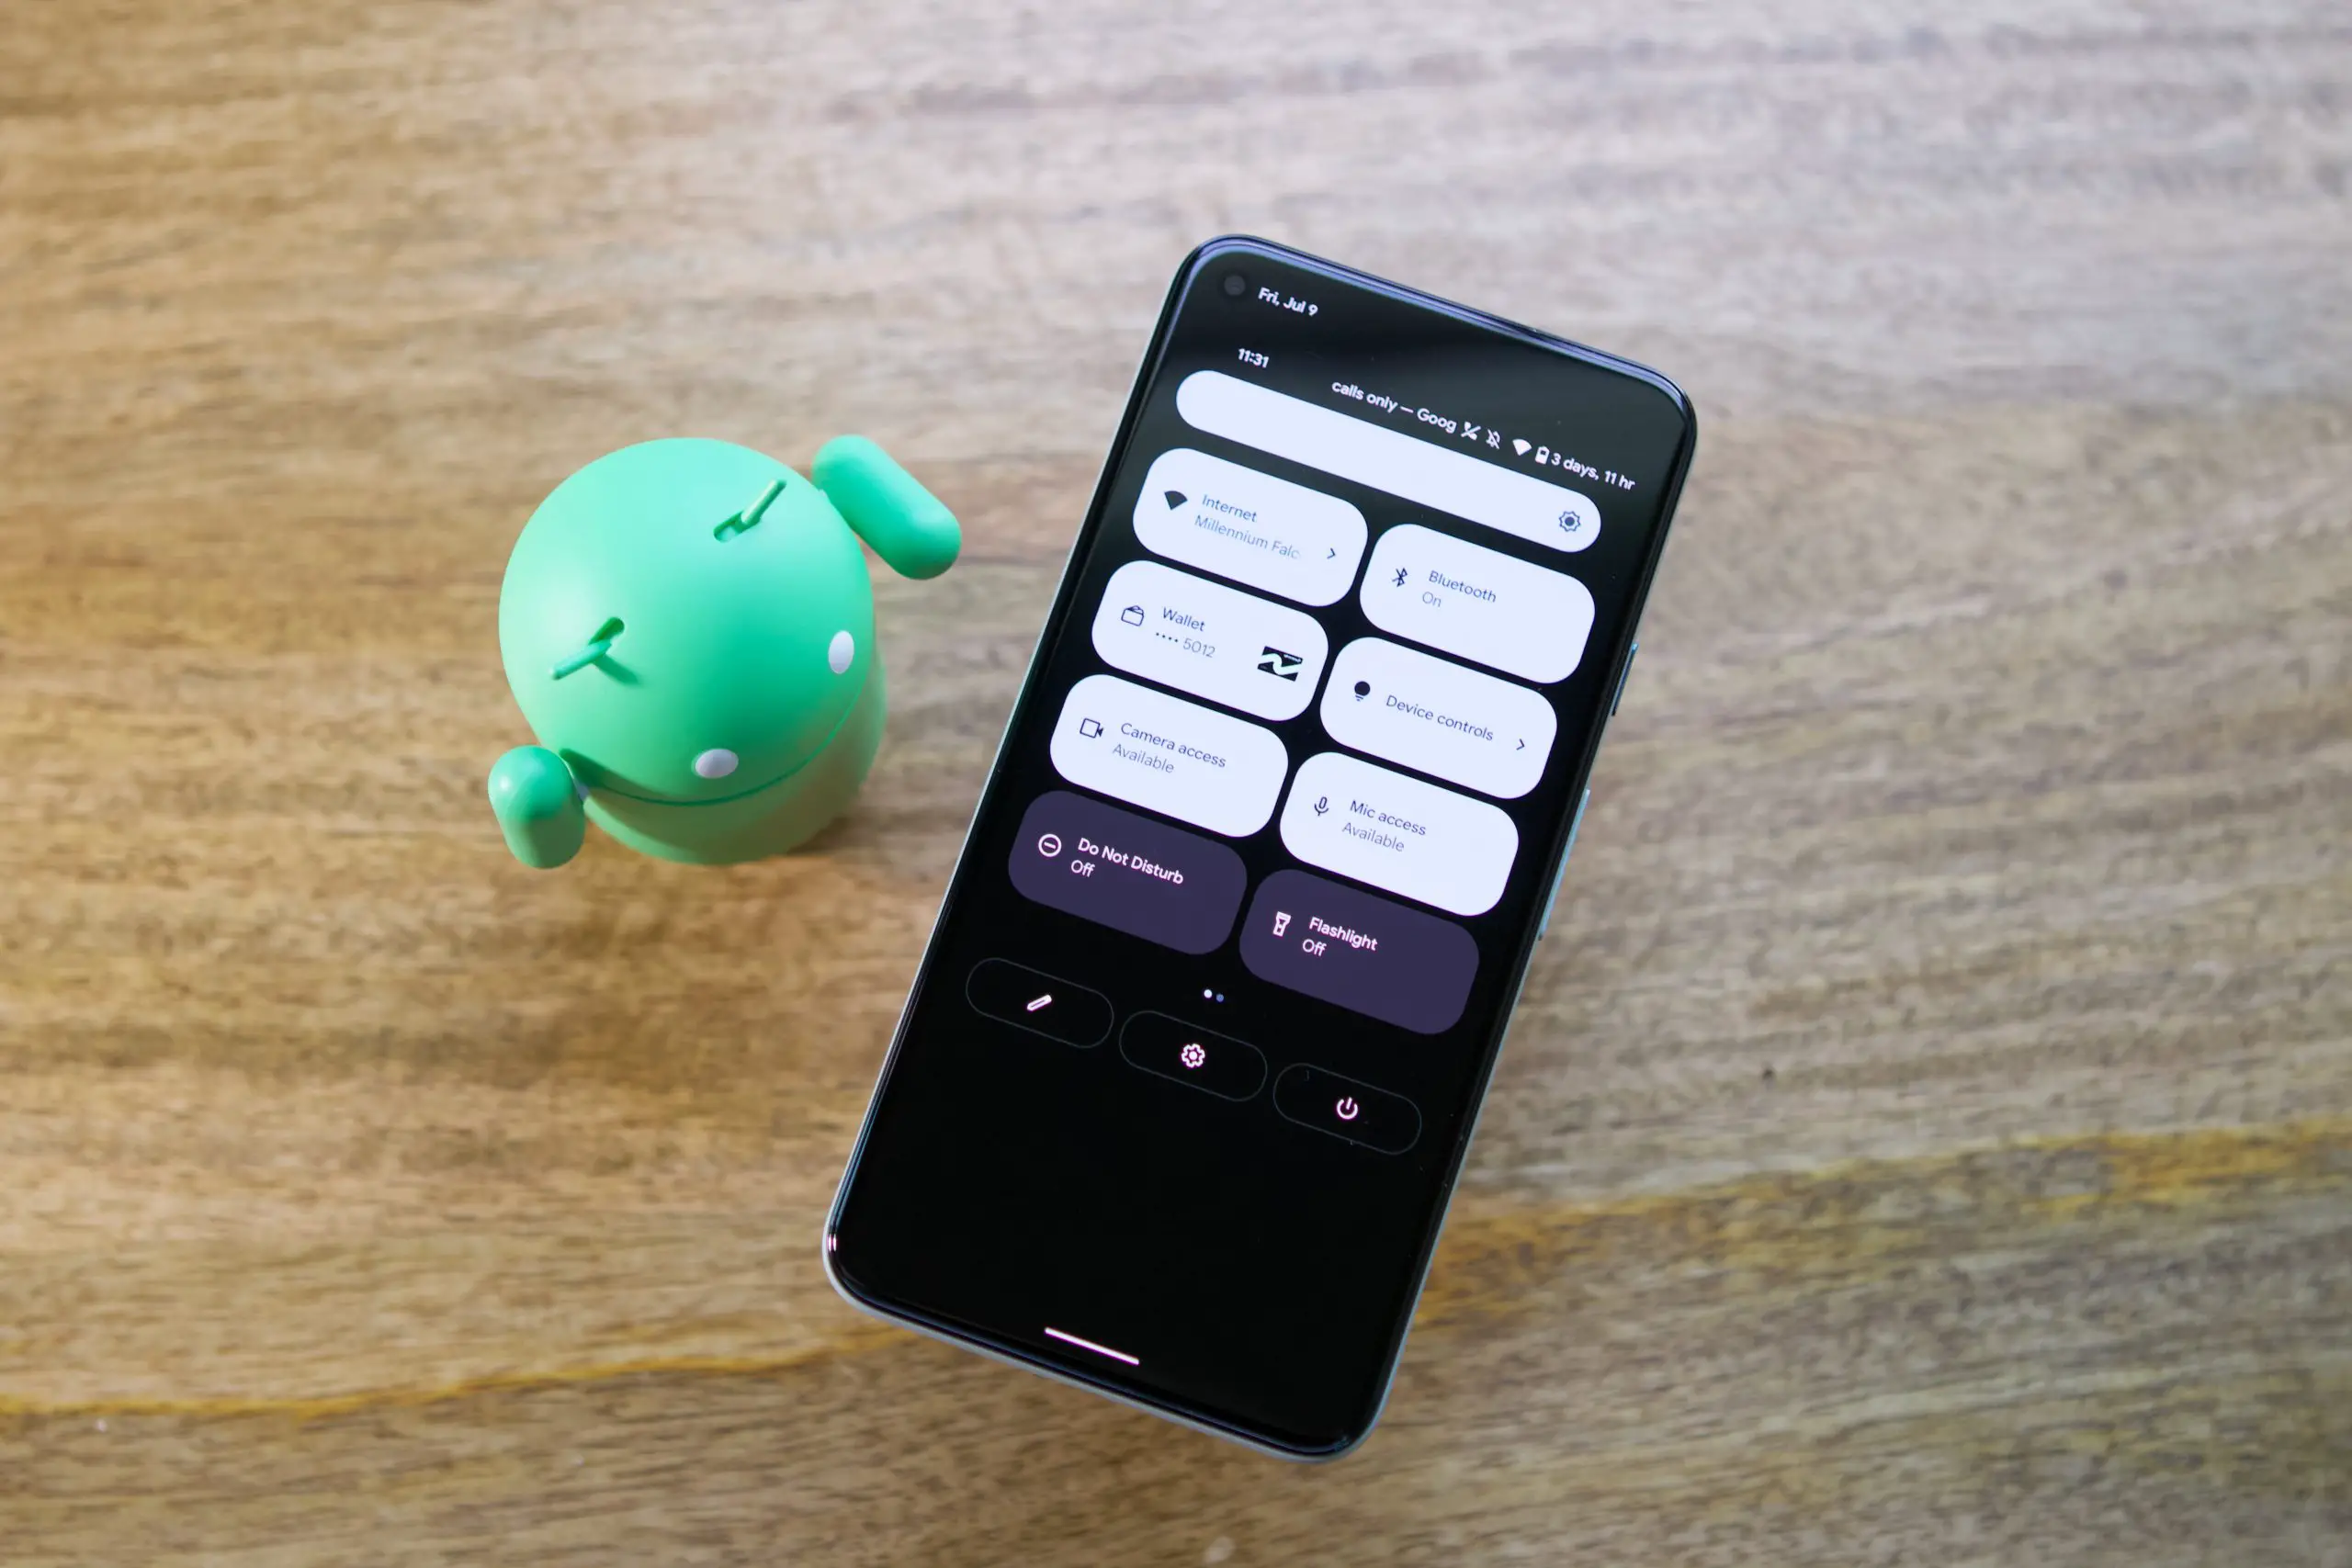
Android 12 has launched a number of new privateness controls that we weren’t precisely anticipating. An instance of that is the power to show off each your microphone and digital camera with only a swipe and a faucet. Whereas sensible shows just like the Amazon Echo Present characteristic a {hardware} swap for each, the identical can’t be mentioned for smartphones.
With the discharge of Android 12, now you can add a few toggles to your Fast Settings panel. That is primarily Google’s reply to that {hardware} swap however will can help you disable an app’s entry to the digital camera and microphone.
- Swipe down in your Dwelling Display screen to disclose the Fast Settings menu.
- Swipe down once more to disclose the edit button within the notification shade.
- Faucet the Pencil icon to edit your Fast Settings toggles.
- Scroll down and discover the next buttons:
- Drag and drop these into the highest portion so as to add them to your Fast Settings panel.
- Faucet the again arrow within the high left to avoid wasting.
As soon as these have been added, you’ll be able to simply swipe right down to entry the Fast Settings panel and faucet both button to revoke entry. By default, digital camera and microphone entry are enabled, however tapping them will flip off entry, no matter what app you might be utilizing.
Tremendous-charged gaming with Sport Mode
![]()
That is one other a type of options that we’ve seen from different smartphone makers, however Android 12 introduces a devoted sport mode. It’s not as strong as what you would possibly discover on one thing just like the ASUS ROG Cellphone 5 or Redmagic 6R, however you continue to have a number of fast choices at your disposal whereas taking part in cellular video games.
- Open the Settings app.
- Faucet Notifications.
- Scroll down and faucet Do Not Disturb.
- Scroll down and faucet Schedules.
- Subsequent to Gaming, faucet the Gear icon.
- Faucet the toggle subsequent to Sport Dashboard to the On place.
- If you wish to allow DND whereas taking part in video games, you may also allow that from right here.
After Sport Mode has been enabled, you will notice a sidebar menu seem on the fitting aspect of the display. This gives fast entry to the brand new Sport Dashboard, together with the completely different choices hidden inside. These embrace a button to stream your gameplay on to YouTube Dwell, together with a Sport Optimization toggle (when out there), and a button to entry your Google Play Video games account.
Customise and edit widgets
![]()
Widgets have been revamped in Android 12 with rounded corners and a greater general aesthetic. Google has even applied tips and instruments for app builders to replace their app widgets to carry a extra uniform look in your Dwelling Display screen. Plus, there’s a brand new manner so that you can edit choose widgets, without having to take away them after which re-add the widget to your Dwelling Display screen.
- Add a widget to your Dwelling Display screen.
- After added, faucet and maintain on to the widget till the house display editor seems.
- Faucet the Pencil icon within the backside left nook of the widget.
For this instance, enhancing a Dialog widget permits me to change to a unique dialog. The choices will differ, relying on what widget it’s that you’re making an attempt to customise. For instance, making an attempt to carry out the identical steps on Google’s Clock widget, doesn’t present any further settings to edit the widget.
Discover the Android 12 Easter Egg
![]()
Though the desserts are (formally) gone, Google nonetheless has an easter egg for Android 12 that you will discover so you’ll be able to showcase your love for Android 12 with delight.
- Open the Settings app.
- Scroll all the way in which to the underside and faucet About telephone.
- Below the Machine particulars part, faucet Android model.
- On the high of the checklist (with the smaller header textual content) faucet Android model a number of occasions.
- In an effort to get the Easter Egg to seem, you have to to quickly faucet the Android model till the Easter Egg reveals itself.
- When the clock seems, drag the minute hand till each fingers are pointed upwards in the direction of the “12” on the clock.
- Let go of the minute hand.
Voila! The Android 12 Easter Egg will current itself to you, with the bubbles being themed primarily based on the colours getting used throughout your system. Though the general design will stay the identical with the completely different bubbles surrounding the “12”, the colours will differ primarily based in your wallpaper.
from WordPress https://ift.tt/3mky7TF


Comenta